Getting Started with Server-Side Swift with MongoDB and Vapor
Tutorials not your style? You can find a complete example project using MongoDB with Vapor on GitHub.
This blog post will take you through the basics of creating a server-side Swift application using MongoDB and Vapor.
This post assumes you have Swift 5.2 (or newer) installed on your machine. You can find instructions to install Swift on various platforms here.
- Step 1: Set up MongoDB
- Step 2: Install Vapor Toolbox
- Step 3: Create a new project
- Step 4: Build and run your application
- Step 5: Test out the application
- Step 6: Explore the code and modify to your liking
- Step 7: Now what?
- References
Step 1: Set up MongoDB
You have two options for this: either downloading and running MongoDB locally, or creating a free MongoDB cluster hosted in the cloud using Atlas, MongoDB’s official database-as-a-service.
Atlas (recommended)
Atlas is the easiest way to get started using MongoDB.
First, follow parts 1-4 in the “Getting Started” tutorial available here.
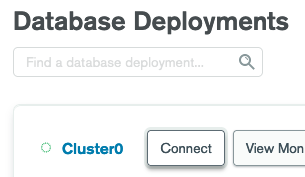
Next, in the “Database Deployments” view on Atlas, click the “Connect” button next to your cluster name:
Then select “Connect your application”:

In the drop-down menu*, select “C” as your driver and “version 1.17 or later” as your version.
Step 2 will then display a connection string in the form mongodb+srv://.... Copy this connection string and save it for use later on in the tutorial.
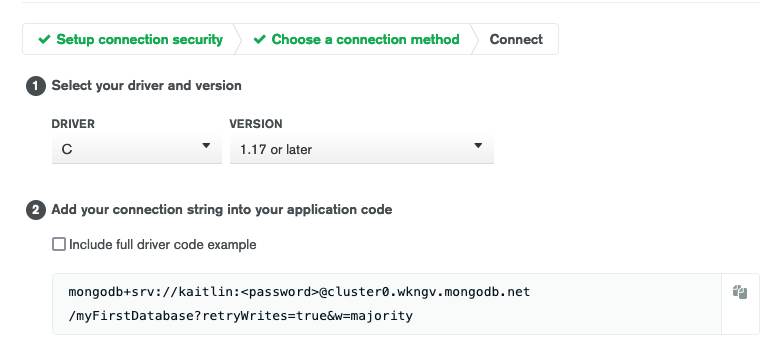
*Unfortunately this drop-down does not include the Swift driver yet, but it will soon! In the meantime, since the Swift driver depends on the C driver, the connection string needed is identical.
Local MongoDB
Follow the instructions available here to install MongoDB Community Edition and start up a local MongoDB server.
Step 2: Install Vapor Toolbox
Vapor Toolbox is a helpful CLI tool for setting up new projects using Vapor. Follow the installation instructions here for macOS or here for Linux.
Step 3: Create a new project
This project will utilize MongoDBVapor, a small library which integrates the official MongoDB Swift driver with Vapor.
You can use Vapor Toolbox from your terminal to instantiate a new project using MongoDBVapor from a template repository, as follows:
vapor new MyProject --template https://github.com/mongodb/mongodb-vapor-template/
This command will prompt you to select whether or not you’d like to use Leaf, a library that allows you to create front-end templates for dynamically generating web pages in your Vapor application.
Would you like to use Leaf? (--leaf/--no-leaf)
y/n>
The rest of this post will assume you entered y, but to create a backend-only application you can enter n.
Step 4: Build and run your application
You can build and run your application either from the command line or using Xcode.
From the command line
First, move into the project directory:
cd MyProject
Then, if you used MongoDB Atlas to start up a cluster above, specify the MongoDB connection string you saved via an environment variable:
export MONGODB_URI="your-connection-string-here"
if you started up a local MongoDB instance via the instructions above, your MongoDB instance should be running on the default MongoDB host and port and so you can skip setting the environment variable, as the driver will default to trying to connect to that.
Next, build your application (this will take a while the first time, as all of the dependencies must be downloaded and built themselves):
swift build
Finally, run your application:
swift run
The terminal should then print:
[ NOTICE ] Server starting on http://127.0.0.1:8080
Or, from Xcode
First, move into the project directory:
cd MyProject
Then, open the project in Xcode:
xed .
Xcode should then automatically resolve and download your project’s dependencies.
Then, if you used MongoDB Atlas to start up a cluster above, specify the MongoDB connection string you saved via an environment variable (if you started up a local MongoDB instance via the instructions above, your MongoDB instance should be running on the default MongoDB host and port and so you can skip this step.)
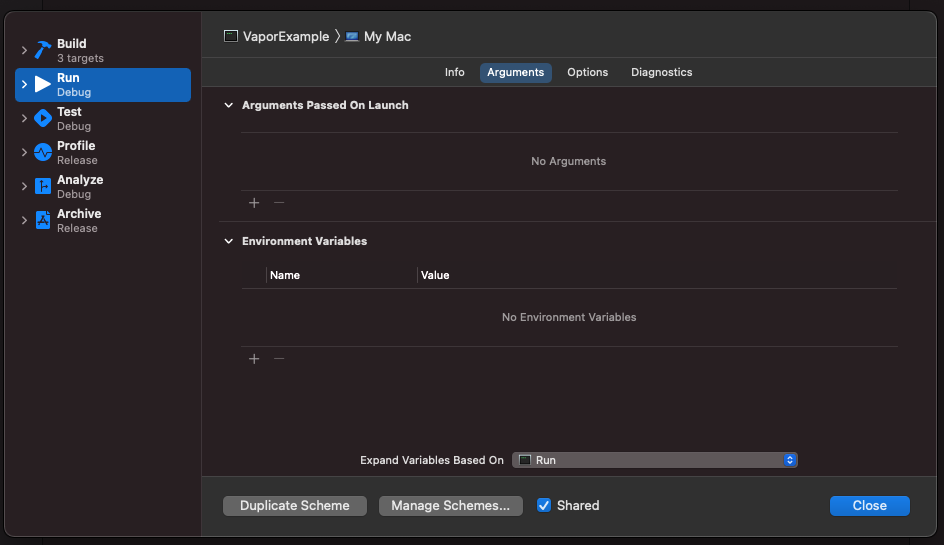
To set the environment variable, click on the package name VaporExample in the top bar of Xcode, then “Edit Scheme”:

Then select “Run” in the menu on the left side, and the “Arguments” tab:
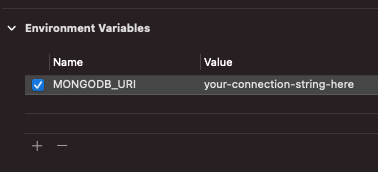
Then, click the + sign under “Environment Variables” and add your connection string under the variable MONGODB_URI.
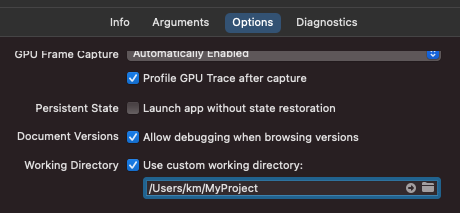
You will also need to set a custom working directory for your project to enable Xcode to locate the Leaf template. To do this, go to the “Options” tab, check the box “Use custom working directory”, and enter the path to your project:
You can then close the scheme editor, and build and run your project by clicking the play symbol button in the top left corner of Xcode.
Once your application is running, the following should display in the Xcode console (you can open this by going to View > Debug Area > Activate Console):
[ NOTICE ] Server starting on http://127.0.0.1:8080
Step 5: Test out the application
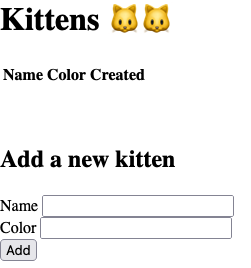
Your application should now be running locally and connected to MongoDB. To test it out, navigate to http://127.0.0.1:8080 in your browser! You should see a page that looks like this:
In the terminal, you should see a corresponding GET request to load the main page:
[ INFO ] GET / [request-id: FD46E644-EC23-4184-86EB-DE6FF601E4CA]
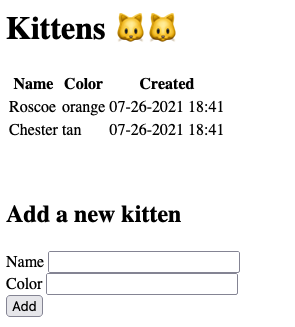
You should be able to add kittens to the list and see the list stay updated in real-time:
After adding a kitten, you should see a POST request logged to create the kitten, followed by a GET request to reload the list of kittens:
[ INFO ] POST / [request-id: C8885B95-BC75-4EED-A022-5592A4073B76]
[ INFO ] GET / [request-id: A7001840-94C6-4DC1-9D2F-FD4C283C5023]
Step 6: Explore the code and modify to your liking
This section will cover the structure of the project and explain the various ways MongoDBVapor is used throughout it.
├── Resources
│   ├── Views
│        ├── index.leaf
├── Sources
│   ├── App
│   │    ├── configure.swift
│   │    └── routes.swift
│   └── Run
│        └── main.swift
├── Tests
│    └── AppTests
│         └── AppTests.swift
└── Package.swift
Package.swift
Package.swift is the Swift Package Manager manifest file, which defines the dependencies and structure of the project, including the dependency on MongoDBVapor. You can read more about SwiftPM and manifest files here on swift.org.
Resources
The Resources/Views directory contains the Leaf template for our app’s main page, index.leaf. By default, this folder is the location where Leaf will look for template files to live.
Sources
Sources contains two directories, App and Run, each corresponding to a target defined in Package.swift.
Sources/App
The App target is where all of the logic for the application itself lives, including configuration code, model types, and request handlers.
configure.swift contains a configure(:_) method that performs one-time configuration code run before the application is started. This includes a line of code to configure a global MongoDB client for the application to use:
try app.mongoDB.configure(Environment.get("MONGODB_URI") ?? "mongodb://localhost:27017")
routes.swift contains:
1) A custom Swift type that matches the structure of documents in the MongoDB collection:
/// A type matching the structure of documents in the corresponding MongoDB collection.
struct Kitten: Content {
   let _id: BSONObjectID?
   let name: String
   let color: String
   var createdAt: Date?
}
This type conforms to Vapor’s Content protocol, which inherits from Swift’s Codable protocol, and allows you to convert it to and initialize it from data in external formats, including HTTP requests/responses and BSON documents, the format MongoDB stores data in.
2) An extension to Request, adding a computed property to access the MongoDB collection we’re working with:
extension Request {
    /// Convenience accessor for the home.kittens collection.
    var kittenCollection: MongoCollection<Kitten> {
        self.mongoDB.client.db("home").collection("kittens", withType: Kitten.self)
    }
}
Associating the Kitten type with the collection allows you to use your custom type directly with driver API methods such as insertOne and find(). The driver will then automatically handle converting back and forth between BSON documents and your data type.
Any MongoDB types accessed via Request.mongoDB will automatically return EventLoopFutures on the same EventLoop the Request is executing on. This simplifies thread safety concerns and improves performance by removing the need to hop the returned futures.
3) a routes(_:) function which registers request handlers on the Application and utilizes the extension and Kitten type defined above:
func routes(_ app: Application) throws {
   // A GET request will return a list of all kittens in the database.
   app.get { req -> EventLoopFuture<View> in
       req.kittenCollection.find().flatMap { cursor in
           cursor.toArray()
       }.flatMap { kittens in
           req.view.render("index.leaf", ["kittens": kittens])
       }
   }

   // A POST request will create a new kitten in the database.
   app.post { req -> EventLoopFuture<Response> in
       var newKitten = try req.content.decode(Kitten.self)
       newKitten.createdAt = Date()
       return req.kittenCollection.insertOne(newKitten)
           .map { _ in Response(status: .created) }
   }
}
Sources/Run
The Run target is the main executable target and contains a single file main.swift with a minimal amount of code to start the application running as well as to clean it up properly on shutdown.
This includes a call to app.mongoDB.cleanup(), which ensures your application’s MongoDB client is properly cleaned up and all connections to the database are closed before the application shuts down.
Tests
This directory contains the unit tests for your application. For now, there is just a simple test in there which confirms the application can start up, connect to a local MongoDB instance, and query for a list of kittens. You can run the test yourself from the command line via swift test, or using the Xcode UI.
Step 7: Now what?
To read more about the available features and see more examples, check out the Example Usage section from the library’s README.
A more complex example application with examples of how to perform various types of MongoDB queries is also available here, with a README which further discusses recommended usage of the library.
You can find the API documentation for MongoDBVapor here, and the documentation for Vapor here.
If you have any questions or feedback on the MongoDB driver or MongoDBVapor we’d love to hear from you, either via GitHub issues or our SWIFT Jira project!
References
- MongoDBVapor GitHub repository
- MongoDBVapor API documentation
- Example project using MongoDBVapor
- Vapor Toolbox template using MongoDBVapor
- Vapor documentation
- MongoDB documentation
- MongoDB Atlas documentation
- MongoDB Swift Driver GitHub repository
- MongoDB Swift Driver Jira project
- Swift Package Manager
- Swift Getting Started Guide